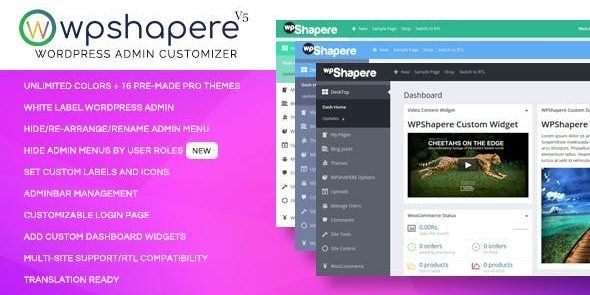
WPShapere – WordPress Admin Theme & White Label Solution
WPShapere is a premium WordPress plugin that lets you completely customize and white‑label the WordPress admin dashboard. Designed for agencies, developers, and freelancers, it provides a professional, branded experience for clients while offering powerful tools to declutter and personalize the admin interface.
🌟 Key Features
Admin Customization
- Unlimited color options with 16+ pre‑made admin themes.
- Flat/default design styles for a modern look.
- Upload custom logos for login and dashboard pages.
- RTL compatibility for multilingual projects.
White Label Branding
- Replace WordPress branding with your company identity.
- Custom login themes with styled forms and branded visuals.
- Hide WordPress version and footer text, add your own branding.
Dashboard Control
- Hide unwanted widgets from the dashboard.
- Manage and customize admin bar elements.
- Rearrange, edit, or hide menu items based on user roles.
User Experience Enhancements
- Clean, clutter‑free dashboard for clients.
- Custom welcome messages and personalized admin pages.
- Export/import settings for quick deployment across projects.
⚡ Why Choose WPShapere?
WPShapere is more than just an admin theme—it’s a complete white‑label solution for WordPress professionals. By transforming the default dashboard into a branded, streamlined workspace, you can deliver a polished experience to clients, reinforce your agency’s identity, and simplify WordPress management.
📋 Quick Setup Checklist
- Install and activate WPShapere.
- Choose a pre‑made admin theme or customize colors.
- Upload your logo and set up a branded login page.
- Hide or rearrange dashboard widgets and menus.
- Export settings for use across multiple client sites.
🛠️ How to Install GPL Themes & Plugins from GPLFox.com
1. Download Your Theme or Plugin
- Visit GPLFox.com and log in to your account.
- Browse or search for the theme/plugin you want.
- Click Download to get the
.zip file onto your computer.
2. Install via WordPress Dashboard
- Log in to your WordPress Admin Panel.
- Go to:
- Themes → Appearance > Themes > Add New > Upload Theme
- Plugins → Plugins > Add New > Upload Plugin
- Click Upload, then select the
.zip file you downloaded from GPLFox. - Press Install Now.
3. Activate the Theme or Plugin
- Once installed, click Activate.
- For themes: your site will immediately switch to the new design.
- For plugins: the plugin will be enabled and ready to configure.
4. Configure Settings
- Most premium themes/plugins include customization options.
- Navigate to the theme’s Customizer or plugin’s Settings panel.
- Adjust layouts, features, and integrations as needed.
5. Keep Files Updated
- GPLFox provides updated versions regularly.
- Re‑download the latest
.zip from GPLFox and repeat the upload process to update your theme/plugin.
✅ Tip for Users: Since GPL products don’t require license activation, you can use them right away after installation. Just make sure to keep them up to date for security and compatibility.